


Setting up Dynamic Wallpaper on
iPhone and iPad with Shortcuts
With the introduction of iOS 14.3 it is now possible to configure a range of Dynamic Wallpaper setups on iPhone and iPad. However doing this requires a long and detailed process with many steps that are easy to get wrong.
These instructions show how to setup one of our 24 Hour Wallpaper dynamic wallpapers on your iPhone or iPad. You can download 24 Hour Wallpapers for iOS from our website here. These wallpapers change to match the time of day like Dynamic Desktop on the Mac. You can use these instructions, or modify them, to setup all sorts of different dynamic wallpapers.
Requires iOS 14.3 or later. We do not provide technical support for setup.
If you have having issues please see our Troubleshooting Page.
Thank you and enjoy your Dynamic Wallpapers!
Stage 1: Download and unzip the wallpaper into your
iCloud Drive / Shortcuts folder.
The first step to setting up the wallpaper is downloading the appropriate zip for your device and unzipping it into your iCloud Drive Shortcuts folder.
On an iPad or iPhone (recommended - as featured in the video above)
To get started, Download a wallpaper from our website to your device using Safari.
Make sure you get the right version for your device.

1. After download open the Files app and look in the Downloads folder for the wallpaper.
2. Tap the downloaded zip to unzip it.

3. Tap and hold the unzip folder until a menu shows. Select “Move” from the menu.
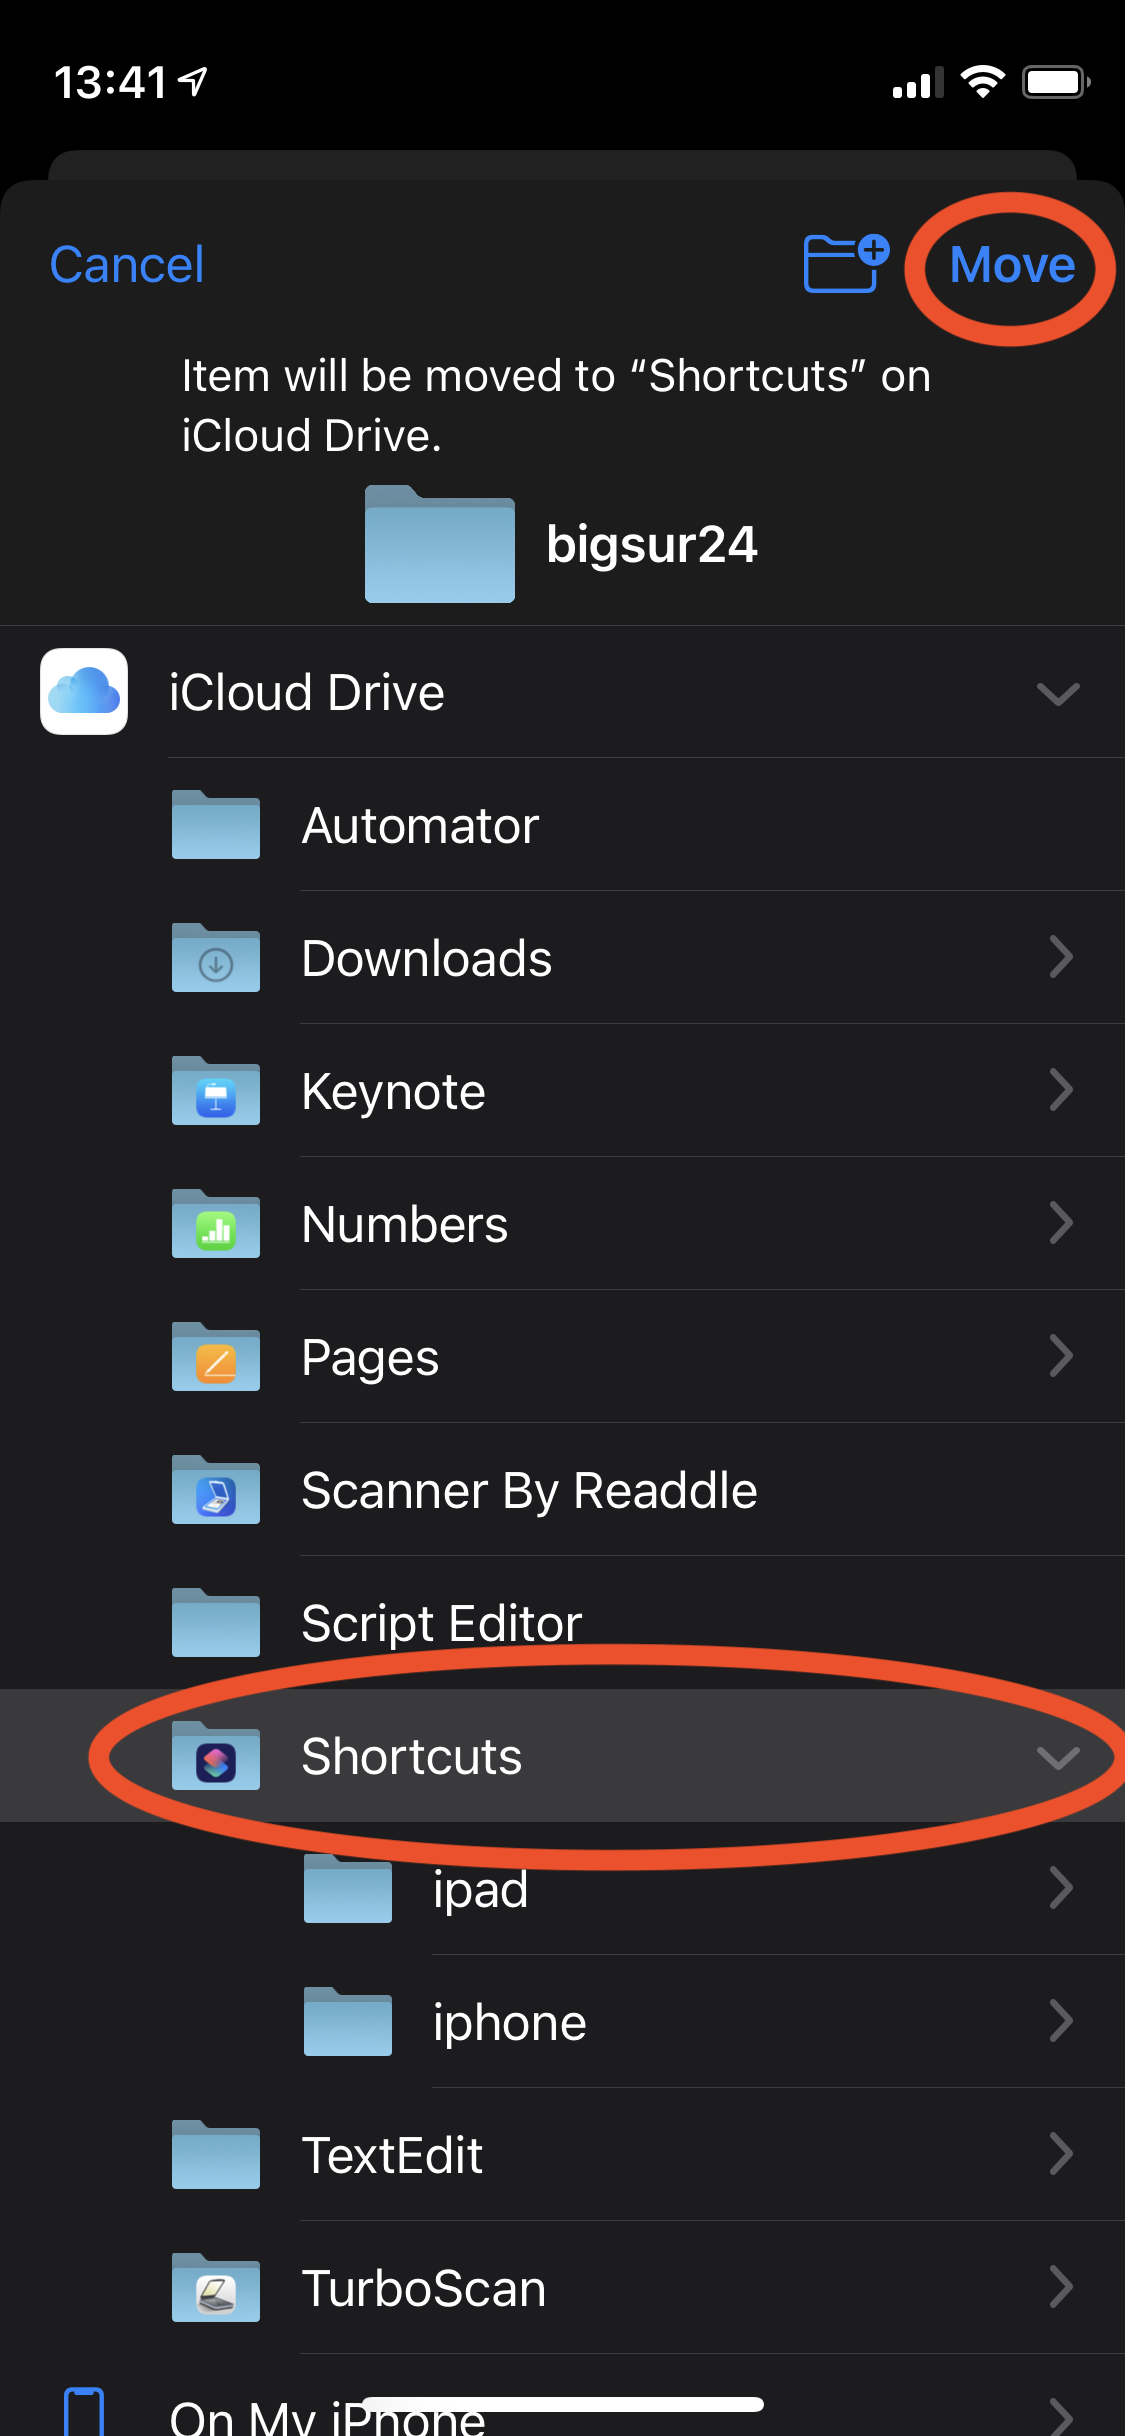
4. On iPhone, tap and hold the folder and select “Move” then select iCloud Drive -> Shortcuts and press “Move.”
On iPad, tap and drag the folder to iCloud Drive and place it in the Shortcuts folder.

5. Tap and hold the folder until options appear, then select “Rename.” Rename the folder to “iphone” or “ipad” depending on device.

ALTERNATE STAGE 1 - On a Mac:
Download a wallpaper from our website.
Make sure you get the right version for your device.Unzip the wallpaper .zip file if your browser does not automatically - this will reveal a folder (such as “bigsur”).
Copy that folder into your iCloud Drive Shortcuts folder (see screenshot below.)
Rename the folder to “iphone” or “ipad” for convenience.
Stage 2: Create eight automations in the Shortcuts App - one for each wallpaper image.
To get started, open the Shortcuts app on your iPhone or iPad.
Repeat the following process for all eight images, changing the filename and time based on the table below.
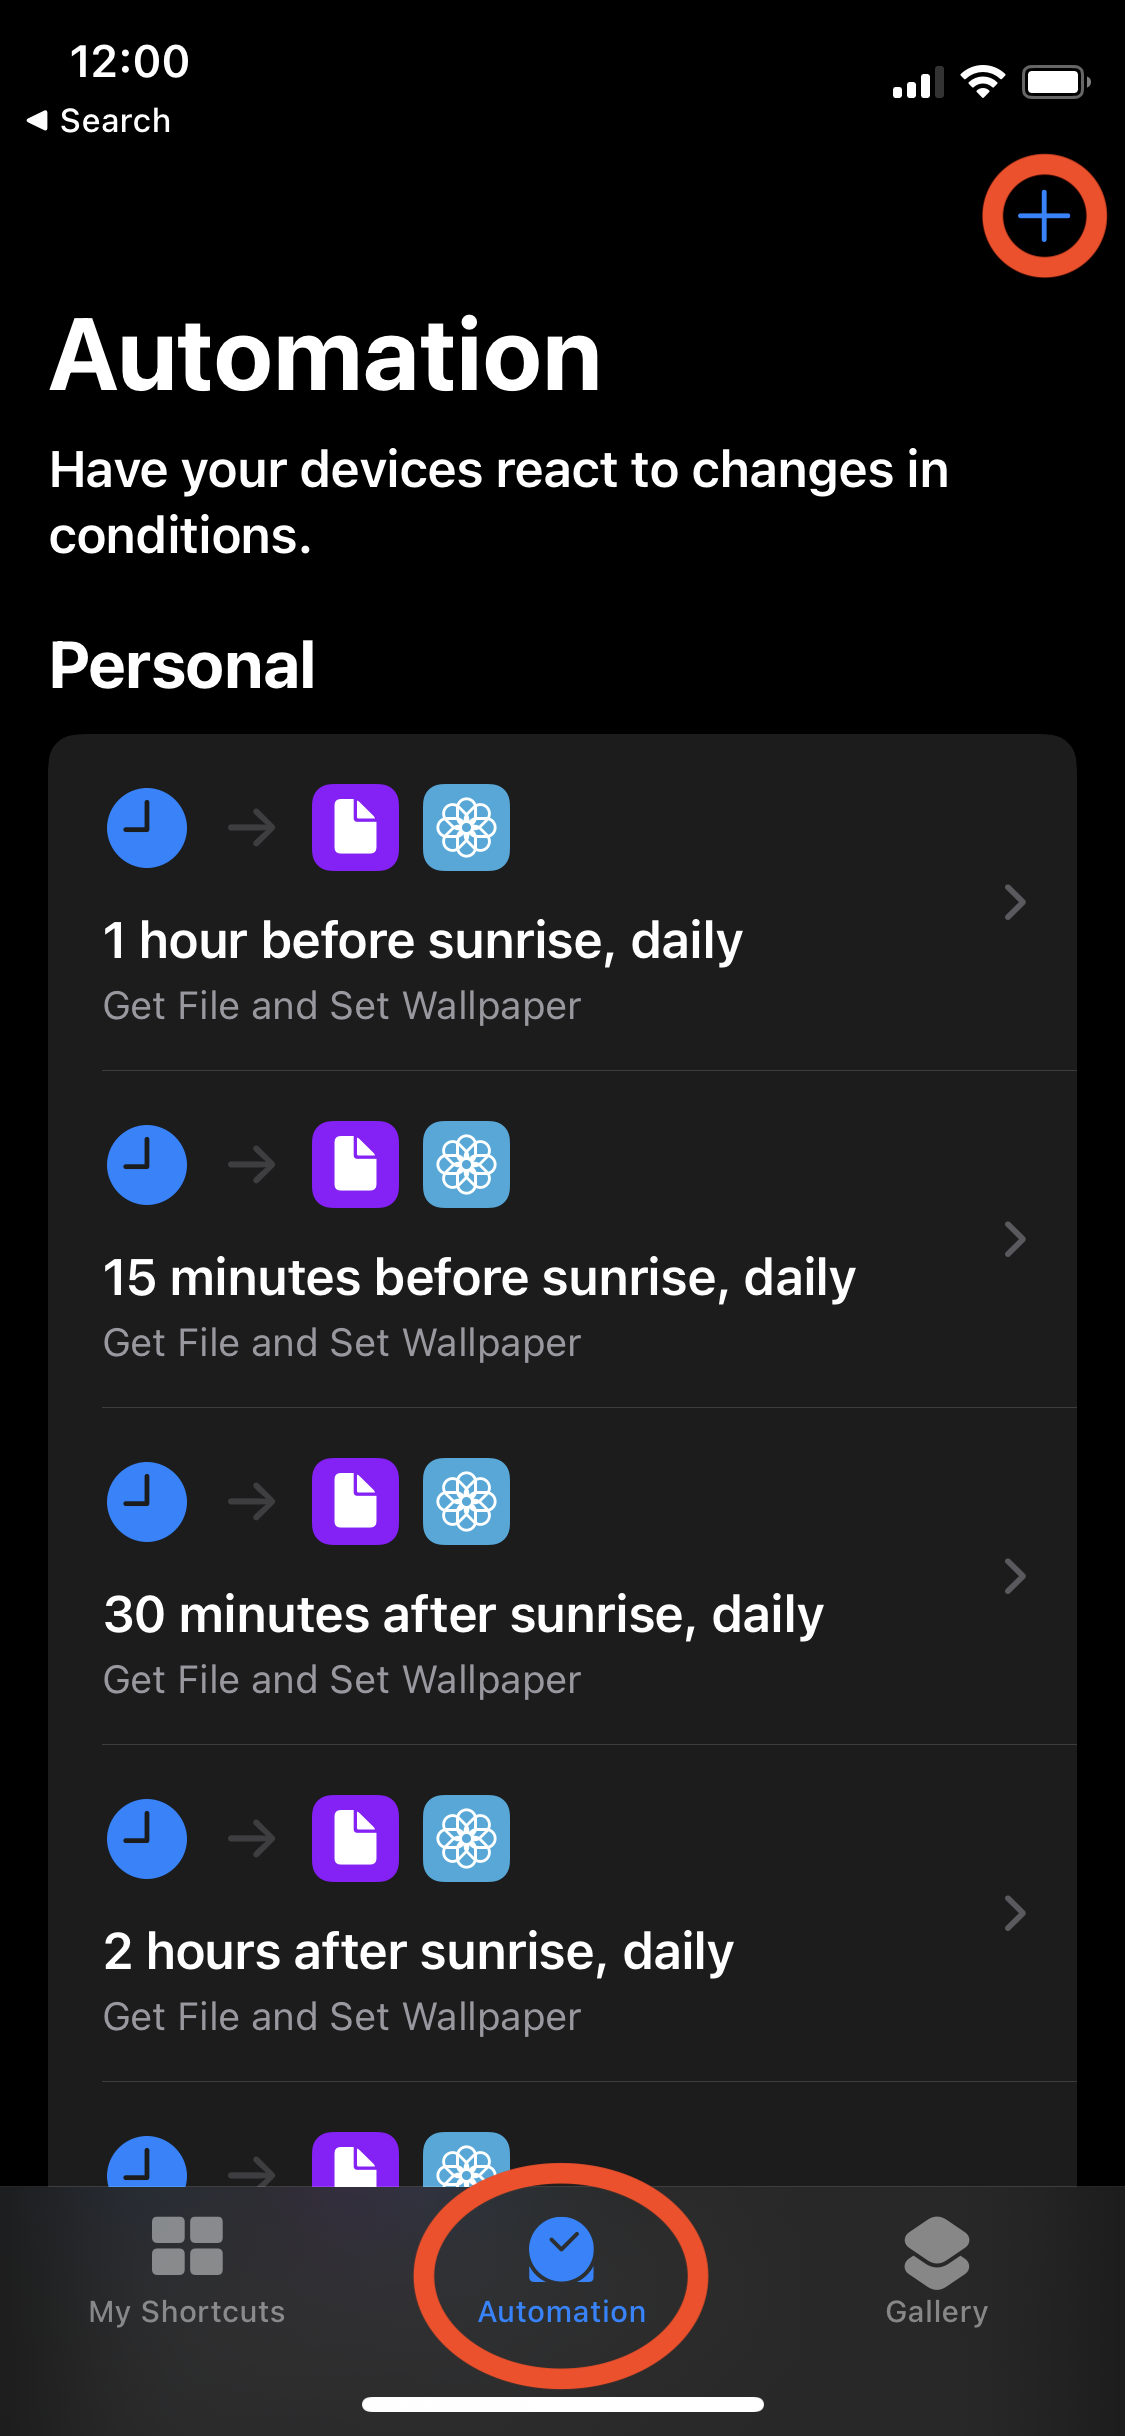
Step 1 - Open the Shortcuts app on your device and select the Automation tab. Press “+” in the upper right to add a new automation.

Step 2 - Press “Create Personal Automation.”

Step 3 - Select “Time of Day” as the automation.

Step 4 - Select “Sunrise” - this will open the next panel.

Step 5 - For the FIRST image, select “1 hour before sunrise.” For the remaining images, see the table below for the correct times. When finished, press Done, then Next.

Step 6 - Press “Add Action”

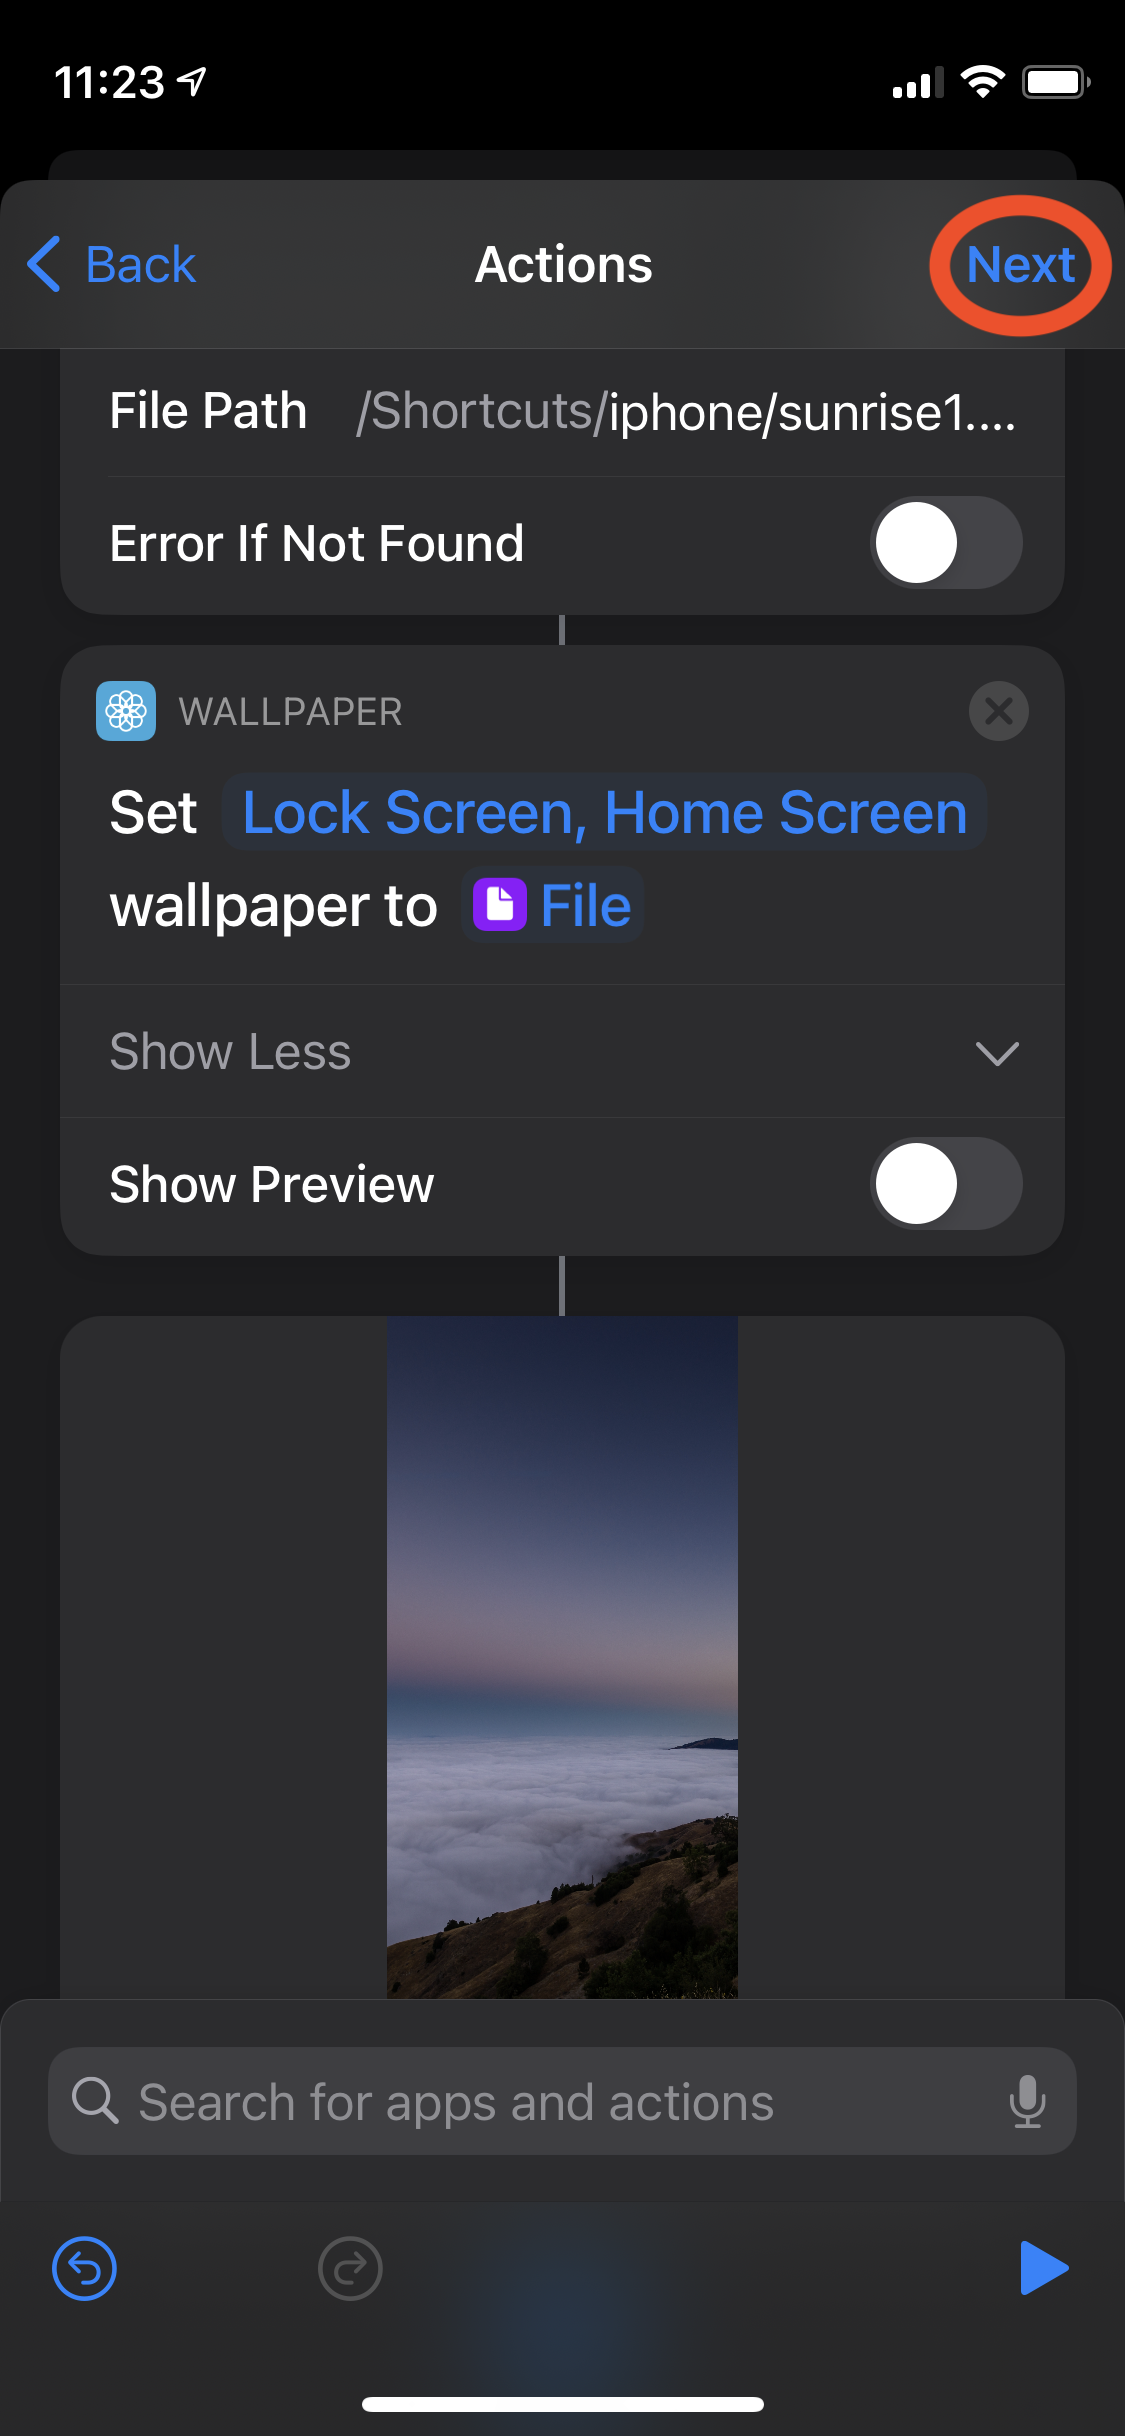
Step 7 - Type “Get file” into the search box and select the “Get File” or “Get File from Folder” action. The name of this action varies by iOS version.

Step 8 - See details to the right of this image.
<<< Step 8 - careful here!
a. Enter the path to the correct file for this step in File Path. If you are using the folder names we recommend, the first file will be “iphone/sunrise1.heic” or “ipad/sunrise1.heic” depending on device.
b. Turn OFF “Error If Not Found.”
See table below for all filenames.
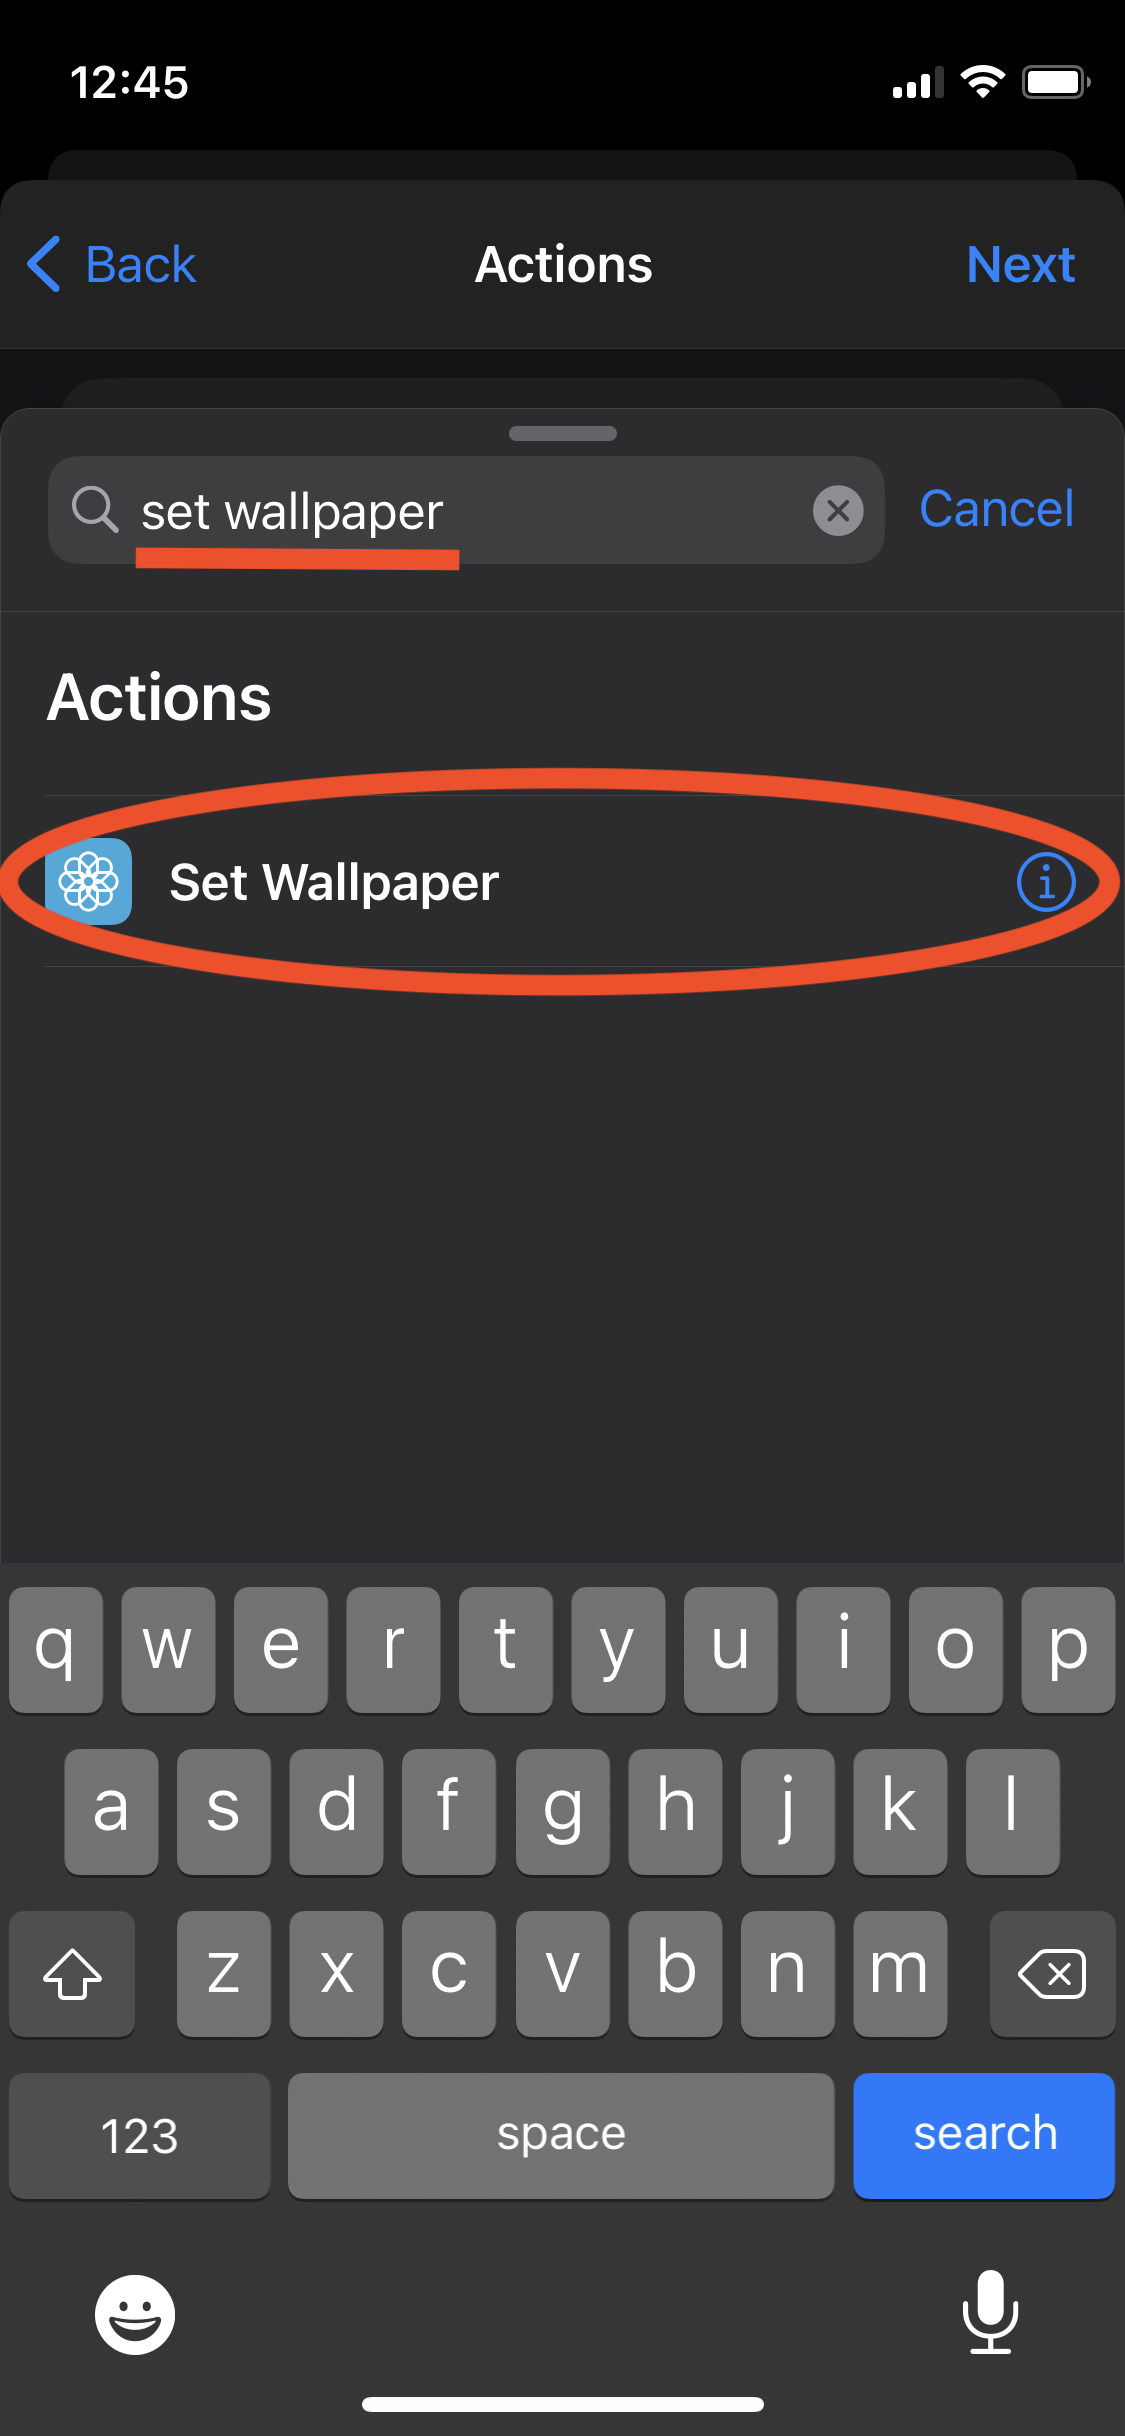
Step 9 - Type in “set wallpaper” and then select the “Set Wallpaper” action.
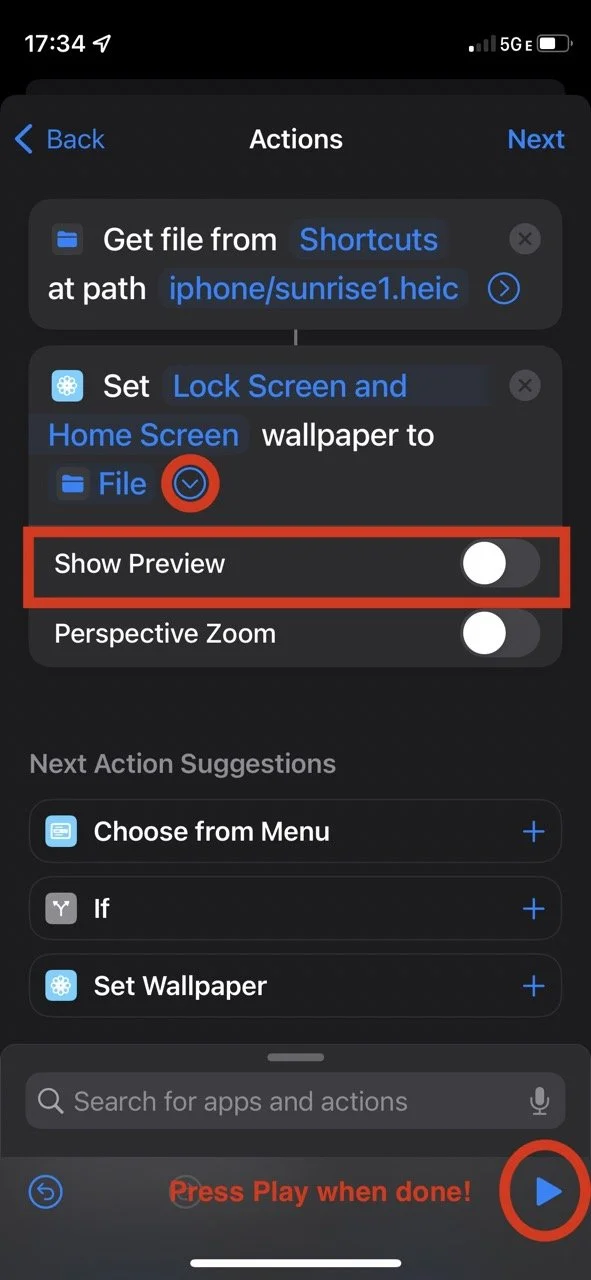
Step 10 - Press “show more” and turn OFF “Show Preview”
YOU MUST PRESS PLAY TO TEST AND ALLOW THE SECURITY PROMPTS.
Step 11 - If everything worked correctly, you should see an image show up. If you are prompted to set wallpaper, turn off Show Preview. Then press Next.
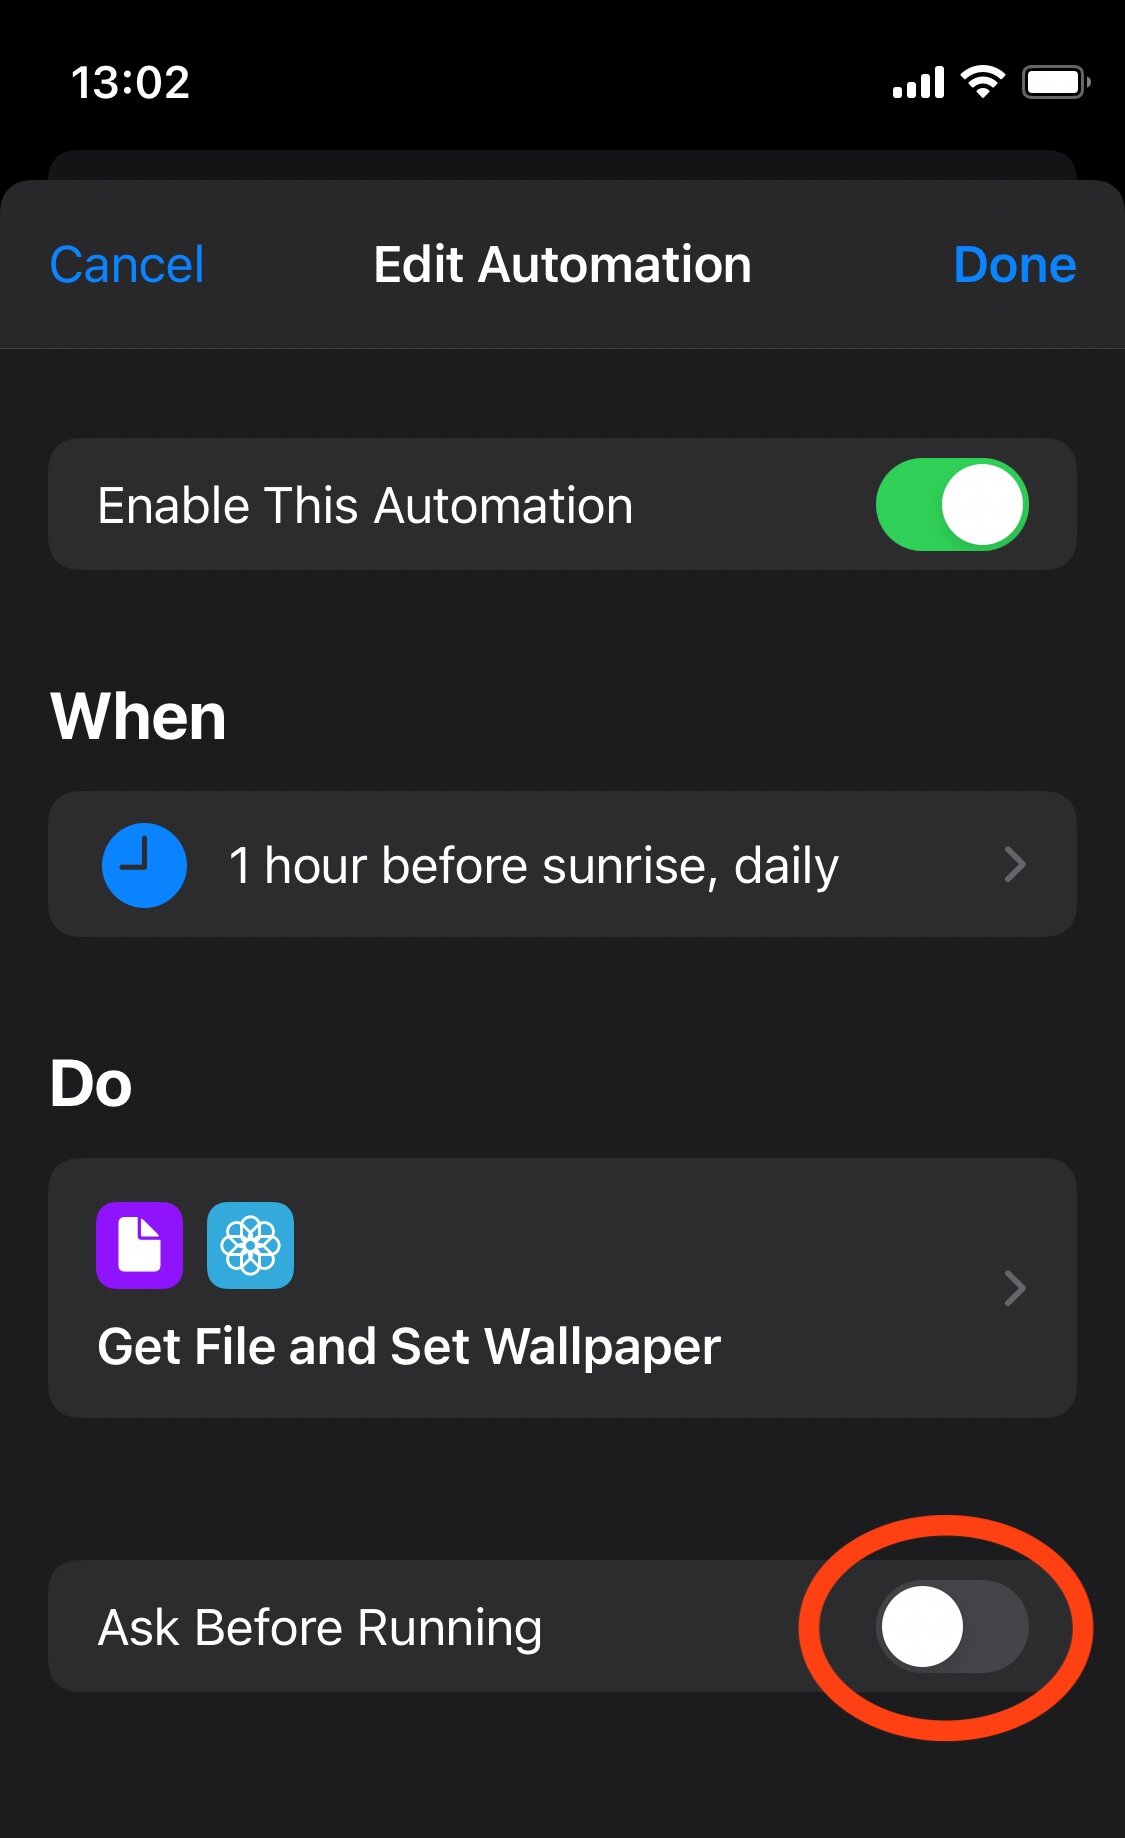
Step 12 - Turn OFF “Ask Before Running.”

FINISHED! Now you need to add the next wallpaper image…
You now need to REPEAT Steps 1-12 for all EIGHT images in the wallpaper you are setting. For each image, make sure that you set the correct path, and correct time. Be careful not to miss any steps, because it is easy to skip steps when you repeat this process (I messed it up many times.)
Image Timing Table - Important! Repeat process above for every image…
Every wallpaper contains eight images - four which are set based on sunrise time, and four which are set based on sunset time. You need to repeat the process above for every one of these images.
sunrise1.heic - 1 hour before sunrise, daily.
sunrise2.heic - 15 minutes before sunrise, daily.
sunrise3.heic - 30 minutes after sunrise, daily.
sunrise4.heic - 2 hours after sunrise, daily (this is the Day photo.)
sunset1.heic - 1 hour before sunset, daily.
sunset2.heic - 15 minutes before sunset, daily.
sunset3.heic - 30 minutes after sunset, daily.
sunset4.heic - 2 hours after sunset, daily (this is the Night photo.)
Please note that these times are what we found to be most optimal for us. Feel free to adjust the timings to better sync with time, or extend or shorten the sunrise or sunset.
Changing Wallpapers Quickly
If you are like me you may want to try out several different wallpapers before deciding on a favorite. The fastest way to do this is to replace the contents of the folder you used for setup on iCloud Drive with the images from another wallpaper. The automations will then automatically begin using that wallpaper when time next changes. You can also press play on the appropriate automation in the Shortcuts app to manually run it now.
This is another reason you may want to rename the folder to “iphone” or “ipad” — it can become the specific destination for whatever wallpaper you want set.
When you have setup all eight image automations, you are ready to move on to Stage #3.
Stage 3: Disable Shortcuts Notifications (optional)
Coming Soon: The upcoming iOS 15.4 update allows shortcut notifications to be silenced! When you update to iOS 15.4 you will need to update each automation to disable the new “Notify When Run” option.
Prior to iOS 15.4: You may notice that each time a shortcut runs there is a notification on your device. Most people will want to disable these notifications. Unfortunately Apple makes this difficult to do, and it may ultimately become impossible. For now, this is achieved by taking the following steps (requires Screen Time.)
This has to be set each time your device restarts :(
You must receive at least one notification from Shortcuts before taking these steps.
To get started, open the Settings app on your device.

Step 1 - Open the Settings app on your device and select Screen Time.
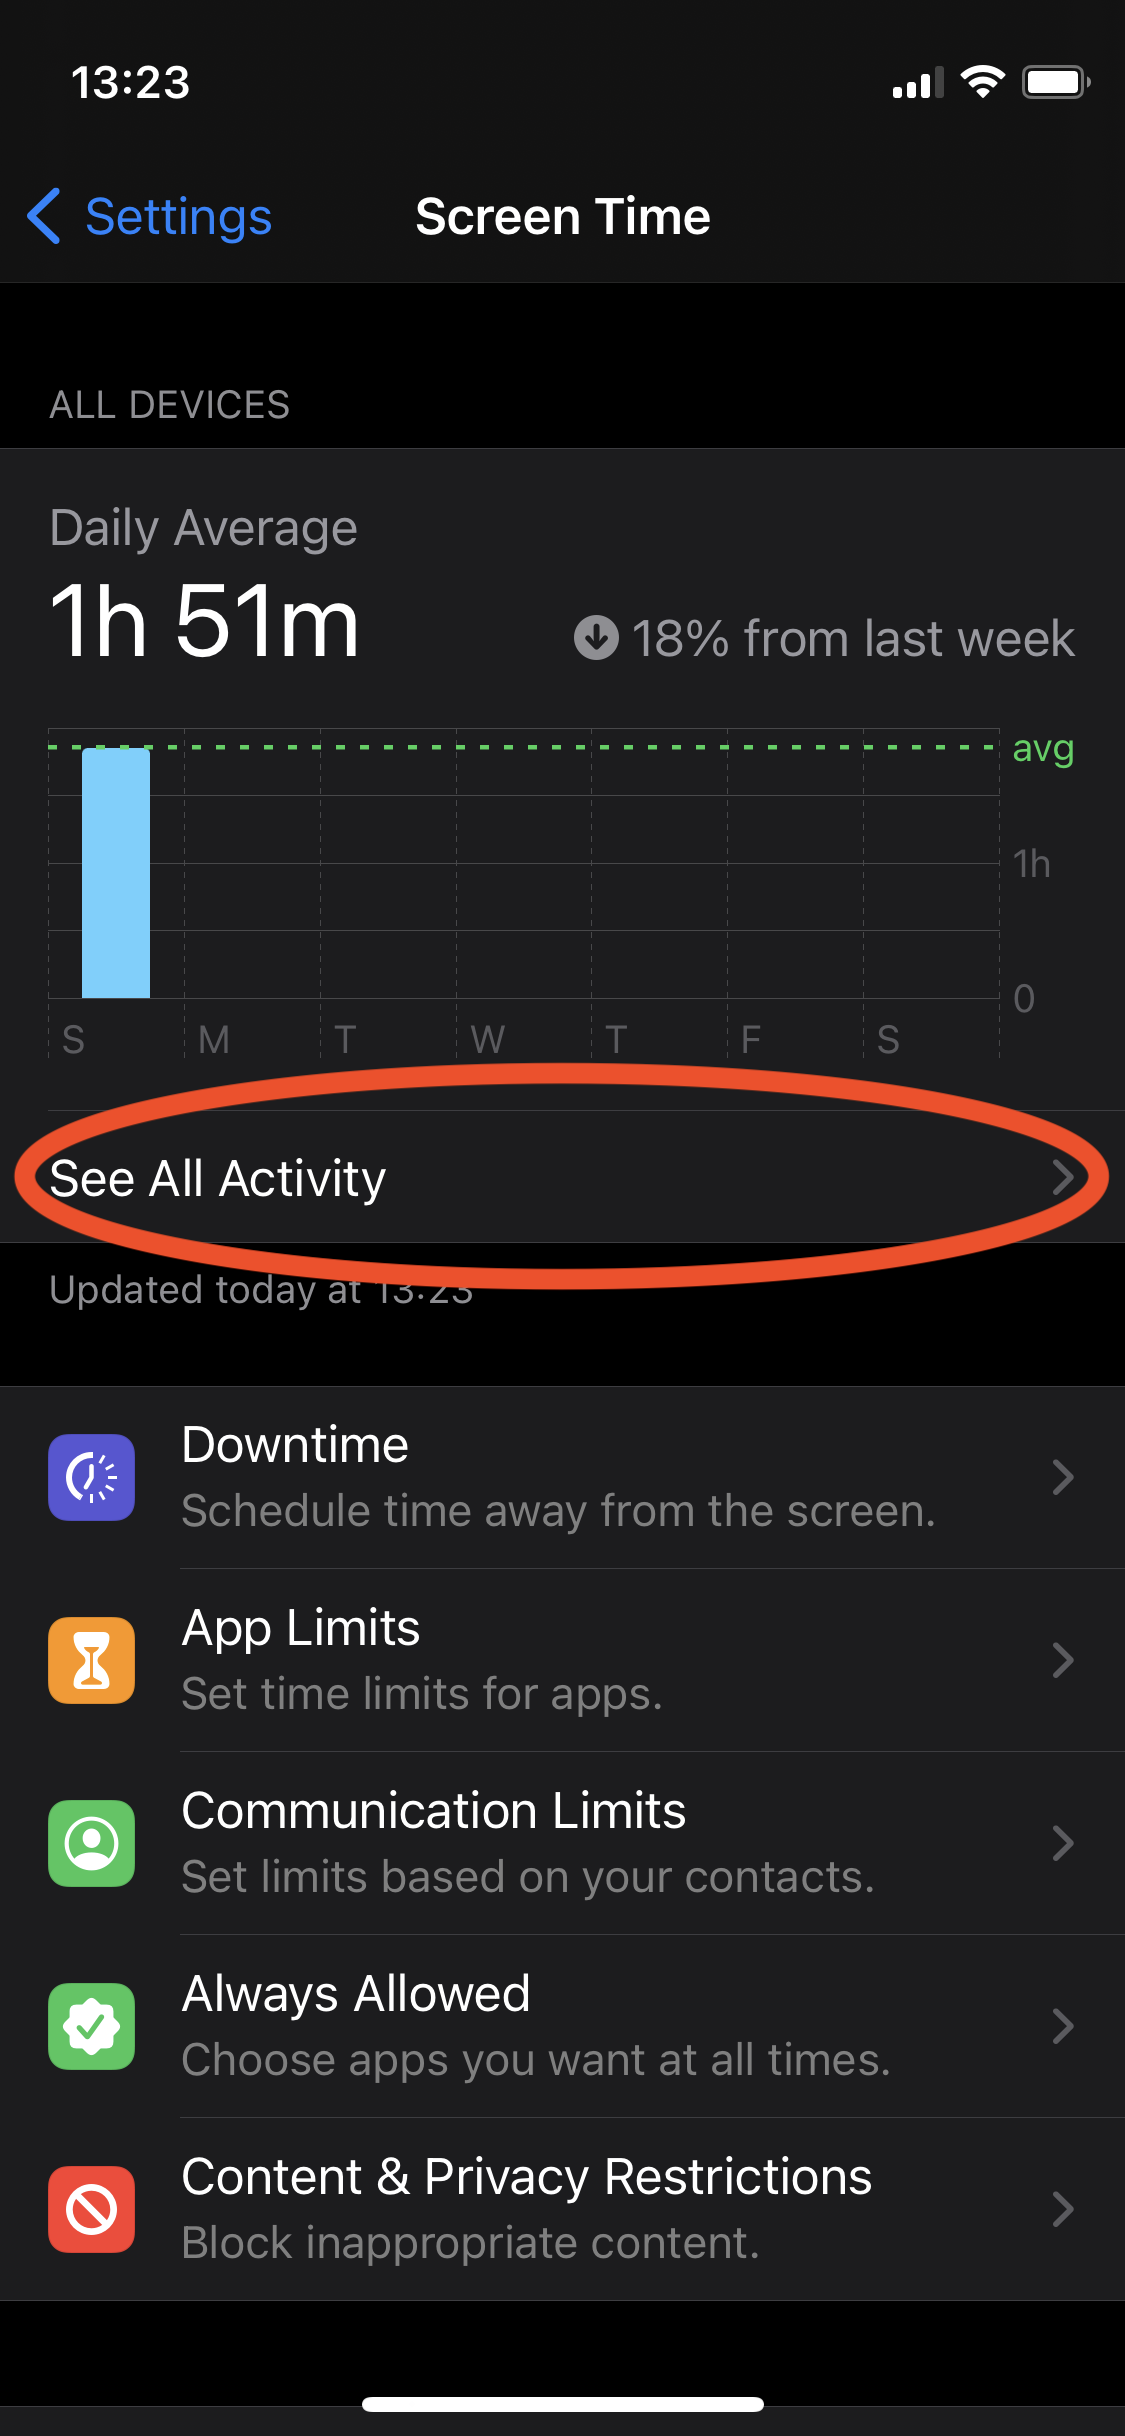
Step 2 - Press “See All Activity”

Step 3 - CRITICAL - Switch between Week and Day tabs AT LEAST ONE TIME. Then select the DAY tab.

Step 4 - Scroll to the bottom in the Day or Week view to find the Notifications section. Tap “Shortcuts” under that section.
If Shortcuts is MISSING, wait until you get a notification from it and then try again.
If there is NO ARROW next to Shortcuts, go back and repeat step #3 above.
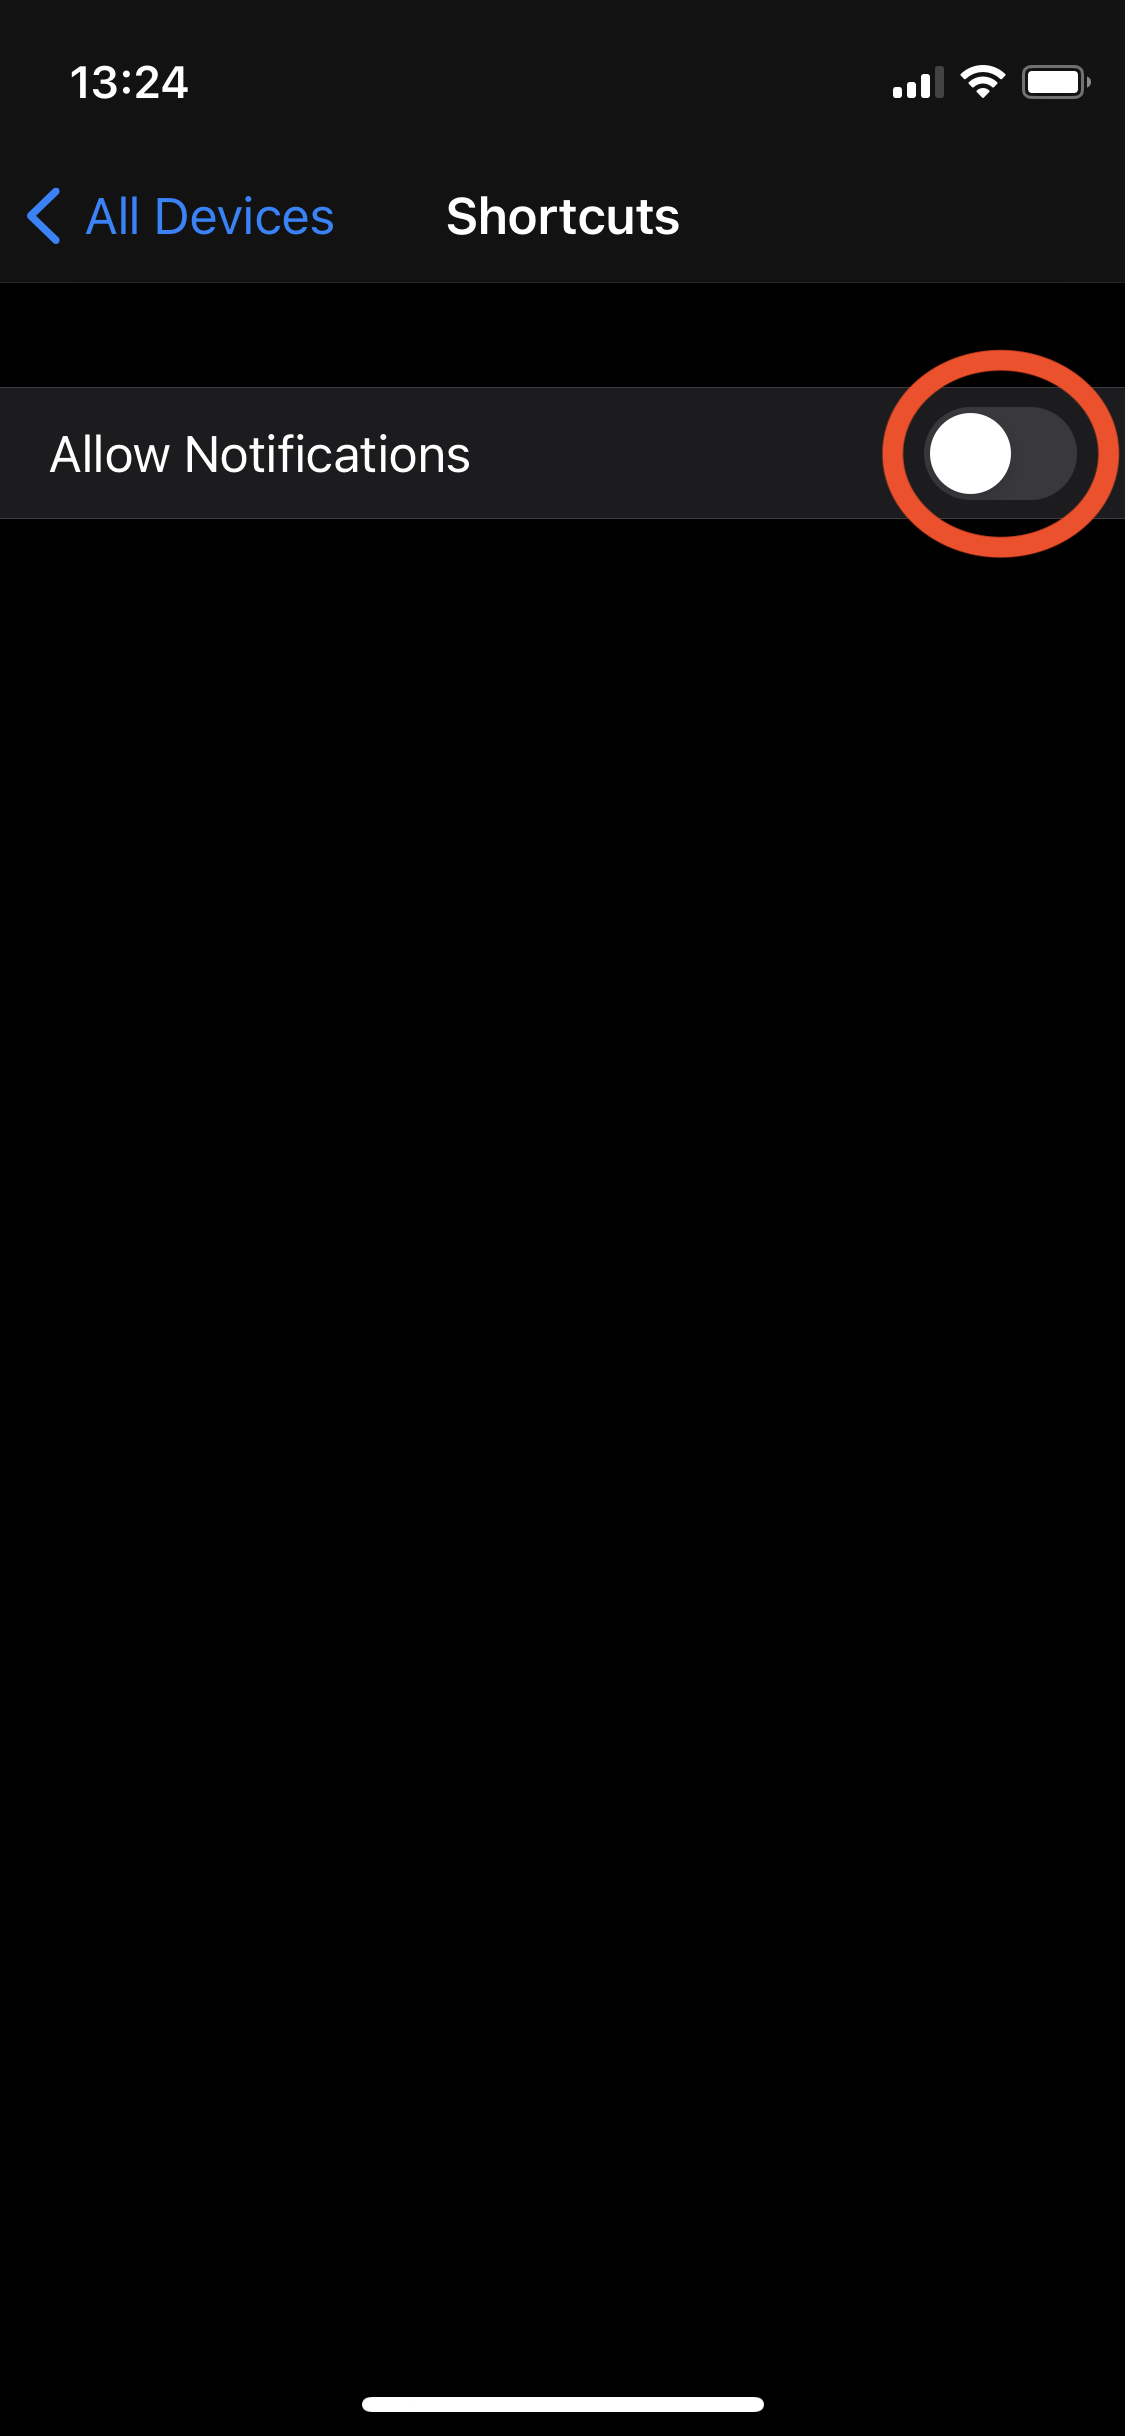
Step 5 - Voila! You can now disable notifications for Shortcuts. This will almost certainly become impossible at some point…