

Magic Window Mac
Screen Saver Plug-in
The screen saver plug-in is an alternative to the built-in screen saver in Magic Window Mac. It integrates directly with macOS which allows it to offer a lock and work behind the login prompt. To use the plug-in, you must have a copy of Magic Window or Magic Window 4K for Mac. If you do not have a copy of the app you can get it here.
Supports macOS 10.13 and later (including Sonoma.) Supports Intel & Apple Silicon (M1/M2.)
Last updated September 28th, 2023.
LIMITATIONS: The plug-in plays scenes at “Turbo” speed only, does not show scene titles, and does not allow you to select which scenes are played. If you want any of those features you should use the in-app screen saver.
GRANTING FULL DISK ACCESS: Additional Apple security steps are required for the screen saver to access downloaded scenes. Details can be found in the install document included with the download.
If you have any problems with this please send us e-mail at support@magicwindowapp.com.
Installing

Open the plug-in installer (download here.)
Accept the license agreement prompt. Then a window will open showing the plugin and INSTALL instructions.
Double click on "Magic Window.saver" to install.
System Preferences/Settings will open and ask you if you want to install the plug-in. Accept the prompt and the screen saver will become selectable on the screen saver panel.
If you are currently using the in-app screen saver you will want to disable it once the plug-in is installed. To disable it, open Magic Window preferences, select the Screen Saver tab, set the slider to "Never."
Follow instructions below or in the included INSTALL.pdf to grant full disk access.

On macOS Sonoma, the screen saver is hidden under the “Other” section at the bottom of the Screen Saver panel. Scroll all the way to the bottom of the panel and click “Show All” next to Other, or scroll all the way to the right.

macOS Ventura (System Settings)

macOS Monterey and earlier (System Preferences)
Granting Full Disk Access
Due to Apple limitations, you must grant Apple’s screen saver process special permissions in order for the screen saver plug-in to access scenes you downloaded through the app. The process to do this is a bit complicated but typical for Apple.

On macOS Ventura and later: In System Settings->Screen Saver, with the Magic Window screen saver selected, click “Options.”
On earlier macOS Versions: In System Preferences->Screen Saver, with the Magic Window screen saver selected, click “Screen Saver Options...”In the options pane, click “Reveal legacyScreenSaver Process”
A finder window will open showing “legacyScreenSaver”
Keep this window open!Press OK to close the Magic Window pop-up.
Press the back arrow to return to System Settings/Preferences.
Open the Privacy & Security panel.
Select the Privacy tab.
Scroll through the list on the left and select “Full Disk Access”
Click the lock in the bottom left and enter your password to allow changes (mac
Drag legacyScreenSaver from Finder to the Full Disk Access panel.
Make sure legacyScreenSaver is checked/enabled.
macOS Ventura and later (System Settings)

macOS Monterey and earlier (System Preferences)

Granting Access to non-App Store apps
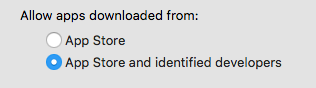
The screen saver is notarized and code-signed with an Apple Developer ID. Your system must allow apps downloaded from "App Store and identified developers" for it to run. Most people already have this option set.
To change this setting, open System Preferences/Settings, select Security, and select "App Store and identified developers" as pictured above. If you can't click it, you need to click the lock in the bottom left hand corner to grant permission.